> ## Documentation Index
> Fetch the complete documentation index at: https://docs.baseten.co/llms.txt
> Use this file to discover all available pages before exploring further.
# Connect your coding agent
> Install the Baseten skill and MCP servers so your agent can manage your Baseten workspace and search these docs.
Install the Baseten skill and MCP servers so your coding agent can manage your Baseten workspace and search these docs. To connect Claude Code, Codex CLI, Pi, Droid, or OpenCode to Model APIs, see [Coding agents](/inference/model-apis/coding-agents).
## Install the agent toolkit
**To install the skill and MCP servers**:
1. Create a dedicated key with management permissions in your [API key settings](https://app.baseten.co/settings/api_keys). A dedicated key lets you revoke agent access without affecting inference or other tools.
2. Set it in your shell so the installer can read it:
```bash macOS / Linux theme={"system"}
export BASETEN_MCP_KEY=...
```
```powershell Windows PowerShell theme={"system"}
$env:BASETEN_MCP_KEY = "..."
```
```cmd Windows cmd theme={"system"}
set BASETEN_MCP_KEY=...
```
To persist the key, add the line to your shell profile (`~/.zshrc` or `~/.bashrc`). On Windows, run `setx BASETEN_MCP_KEY "..."`.
3. Run these commands in a shell that exports `BASETEN_MCP_KEY`. The `-g` flag makes the installation available to each detected agent, and `-y` skips confirmation prompts:
```bash macOS / Linux theme={"system"}
npx skills add basetenlabs/baseten-skills -g -y
npx add-mcp https://api.baseten.co/mcp -g -y --header "Authorization: Bearer ${BASETEN_MCP_KEY}"
npx add-mcp https://docs.baseten.co/mcp -n baseten_docs -g -y
```
```powershell Windows PowerShell theme={"system"}
npx skills add basetenlabs/baseten-skills -g -y
npx add-mcp https://api.baseten.co/mcp -g -y --header "Authorization: Bearer $env:BASETEN_MCP_KEY"
npx add-mcp https://docs.baseten.co/mcp -n baseten_docs -g -y
```
```cmd Windows cmd theme={"system"}
npx skills add basetenlabs/baseten-skills -g -y
npx add-mcp https://api.baseten.co/mcp -g -y --header "Authorization: Bearer %BASETEN_MCP_KEY%"
npx add-mcp https://docs.baseten.co/mcp -n baseten_docs -g -y
```
4. Restart your coding agent so it loads the skill and MCP configuration.
Alternatively, ask your agent to install the toolkit. Paste this prompt:
```md theme={"system"}
Install the Baseten agent toolkit globally by following the instructions at https://github.com/basetenlabs/baseten-skills:
- Install the `baseten` skill.
- Add the backend MCP server at https://api.baseten.co/mcp with the header "Authorization: Bearer $BASETEN_MCP_KEY".
- Add the docs MCP server at https://docs.baseten.co/mcp.
Run the commands in a shell that exports BASETEN_MCP_KEY. Don't print the key. After installation, tell me how to verify the setup and whether I need to restart my agent.
```
**To confirm that the servers are connected**:
Run `/mcp`. You should see:
```output theme={"system"}
baseten ✔ connected
baseten_docs ✔ connected
```
If Claude Code prompts before reading skill files, add this to `~/.claude/settings.json`:
```json theme={"system"}
{
"permissions": {
"allow": ["Read(~/.claude/skills/**)"]
}
}
```
**To confirm that the servers are connected**:
Open MCP settings and confirm both `baseten` and `baseten_docs` show as connected.
Verify the setup by asking your agent to list the models in your workspace. If your agent exposes skills as slash commands, you can also run `/baseten`.
The backend MCP server connects to the workspace associated with its API key. To work with multiple workspaces, install additional backend server instances under different names and use a different key for each one.
## Configure your agent manually
Use these instructions if the installer does not detect your agent. Add both MCP servers to your agent's configuration, then install the skill with `npx skills add basetenlabs/baseten-skills`. For a docs-only setup, add `baseten_docs` without an authorization header.
**To add the MCP servers by hand**:
Add this to `mcp.json`:
```json mcp.json theme={"system"}
{
"mcpServers": {
"baseten": {
"type": "http",
"url": "https://api.baseten.co/mcp",
"headers": { "Authorization": "Bearer ${BASETEN_MCP_KEY}" }
},
"baseten_docs": { "type": "http", "url": "https://docs.baseten.co/mcp" }
}
}
```
**To add the MCP servers by hand**:
Add this to `.vscode/mcp.json`:
```json .vscode/mcp.json theme={"system"}
{
"servers": {
"baseten": {
"type": "http",
"url": "https://api.baseten.co/mcp",
"headers": { "Authorization": "Bearer ${BASETEN_MCP_KEY}" }
},
"baseten_docs": { "type": "http", "url": "https://docs.baseten.co/mcp" }
}
}
```
**To add the MCP servers by hand**:
1. Install the skill:
```bash theme={"system"}
npx skills add basetenlabs/baseten-skills
```
2. Add the backend MCP server:
```bash theme={"system"}
claude mcp add --transport http baseten https://api.baseten.co/mcp --header "Authorization: Bearer ${BASETEN_MCP_KEY}"
```
3. Add the docs MCP server:
```bash theme={"system"}
claude mcp add --transport http baseten_docs https://docs.baseten.co/mcp
```
`npx add-mcp` and `npx skills add` also detect Codex, Antigravity, Goose, Windsurf, and other supported agents. For GUI clients such as Claude Desktop, add both server URLs in the connector settings. Any MCP-compatible agent can use the URLs above.
## Next steps
Call Model APIs from Pi, Droid, or OpenCode, or install Baseten Switch for Claude Code, Codex CLI, or Pi.
Deploy a Hugging Face model with vLLM and the Baseten CLI.
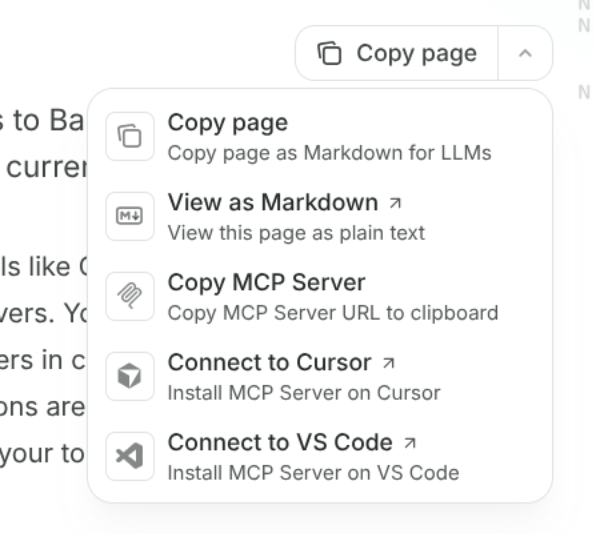
Append `.md` to any docs URL to open the page as Markdown. You can also use [llms.txt](https://docs.baseten.co/llms.txt) to index the documentation or [llms-full.txt](https://docs.baseten.co/llms-full.txt) to retrieve its full text. The **Copy page** button in the upper-right corner of each page copies the Markdown or opens it as plain text:
 If you cannot install the full `baseten` skill, install the lightweight docs skill instead:
```bash theme={"system"}
npx skills add https://docs.baseten.co
```
If you cannot install the full `baseten` skill, install the lightweight docs skill instead:
```bash theme={"system"}
npx skills add https://docs.baseten.co
```